Announcement

Collapse
No announcement yet.

Using NeroVision Express - Making a DVD with Menus

Collapse
This topic is closed.
X
X
 
  • Time
  • Show
Clear All
new posts
  • jmet
    Super Moderator
    • Nov 2002
    • 8697

    Using NeroVision Express - Making a DVD with Menus


    In the guide I will show you how to make a DVD with menus from various video clips using NeroVision Express.

    Software you will need:

    <a href="http://ww2.nero.com/nero6/us/nero-up.php">NeroVision Express</a> (Part of the <a href="http://ww2.nero.com/nero6/us/nero-up.php">Update-Package 2</a> download)

    <hr>

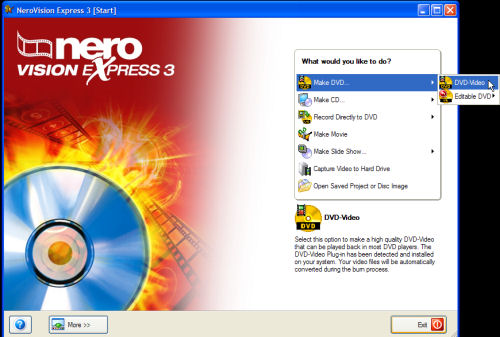
    Start up NVE and click "Make DVD" and then click "DVD-Video". (Screen Shot Below)


    <hr>

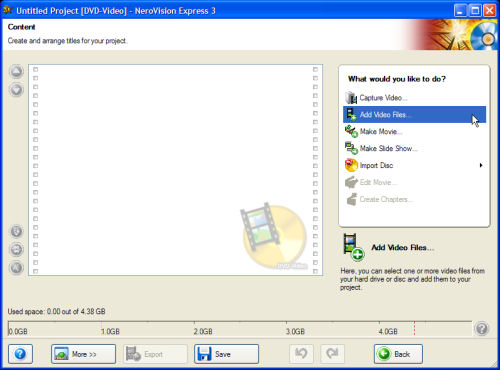
    Now click "Add Video Files..." on the right, that will bring you to the content screen. (Screen Shot Below)

    Last edited by jmet; 7 Feb 2006, 05:00 AM.
  • jmet
    Super Moderator
    • Nov 2002
    • 8697

    #2
    Using NeroVision Express - Making a DVD with Menus

    After you click ""Add Video Files..." (red), the open dialog box will pop up. Go ahead and select the file you want to add to the DVD (blue). Repeat for each file you want to add. Then click "Next" (green) (Screen Shot Below)


    <hr>

    After NVE adds the files you selected, it will bring you back to the "Content" screen where you have several options. You can import more video from a disc (red), edit the movie (ie. Add transitions, fade ins and fade outs, etc.) (blue), you can even add chapters for each different video clip (green). (Screen Shot Below)

    Comment

    • jmet
      Super Moderator
      • Nov 2002
      • 8697

      #3
      Using NeroVision Express - Making a DVD with Menus

      This screen is totally designated to the appearance and physical layout of the menus. It allows you to:

      1. Change where items are on the menu and how many items there are per menu screen (red).

      2. The picture you want displayed as the background image (blue).

      3. Select the way the buttons look (green).

      4. What kind of font you want displayed for your text (purple).

      5. The text you want displayed at the top and bottom of the menu (yellow).

      6. You can set the properties of shadows or turn them off completely (light blue).

      7. Set how you want the menu to function (grey).

      8. Set what color is show when you highlight a item and what color is shown when you select a item (pink).
      (Screen Shot Below)

      Comment

      • jmet
        Super Moderator
        • Nov 2002
        • 8697

        #4
        Using NeroVision Express - Making a DVD with Menus

        After selecting how you want it to look, you are taking to a screen where you can configure each menu screen separately by clicking the green arrows (red). (As you can see I changed my a tad bit. lol)

        HINT: Right click on the video clip preview buttons (green) and you can also left click the buttons, hold and drag them where you want (green). When your done, click Next (blue) (Screen Shot Below)


        <hr>

        Here you can actually test it out before you burn it. See what button on your remote would do what and how you would interact with the menu itself. Just click the buttons on the remote picture to see what they would do (green). Click Next when your done (red). (Screen Shot Below)

        Last edited by jmet; 7 Feb 2006, 08:09 AM.

        Comment

        • jmet
          Super Moderator
          • Nov 2002
          • 8697

          #5
          Using NeroVision Express - Making a DVD with Menus

          On this screen, you have few different options as to what way you want to output the DVD.

          Depending on the current size of the DVD (green) it may be too big to fit on a single layer blank DVD, not a problem though! Just select "Write to Hard Disk Folder" (red) so that once its finished writing to your hard drive, you can use DVD Shrink or similar to compress it down to fit on single layer DVD-R/DVD+R. You will also have to select a destination directory so that NVE knows what folder to save files in (blue). (Screen Shot Below)


          <hr>

          If you know it will fit, you can configure NVE to go ahead and burn it to a blank disc by selecting "Burn To..." (red) and selecting which drive you want to burn it (blue). Do not click the burn button yet, read the next page. (Screen Shot Below)

          Last edited by jmet; 7 Feb 2006, 08:19 AM.

          Comment

          • jmet
            Super Moderator
            • Nov 2002
            • 8697

            #6
            Using NeroVision Express - Making a DVD with Menus

            Ok now click "Recording Settings" (red). I recommend burning no faster than 4X or half the speed your disc is rated at (green). If your using DVD+R media and your burner support "Bitsetting", set the "Book Type setting" to "DVD-ROM" (blue) for maximum compatibility that should play on any DVD player. (Screen Shot Below)


            <hr>

            Click the burn button now and just wait for it to finish.
            Last edited by jmet; 7 Feb 2006, 08:15 AM.

            Comment

            Working...
            😀
            🥰
            🤢
            😎
            😡
            👍
            👎